Audit FAQs
FAQ Directory
TriumphPay Audit Portal Navigation
- TriumphPay Audit Document Viewer Keyboard Shortcuts
- How do I add, edit and delete users from TriumphPay Audit?
- How do I see the processed queue and/or approve invoices?
- How do I merge emails on the dashboard?
Documents
- How do I ignore or “delete” a document?
- How do I send documents to TriumphPay Audit?
- How do I group documents within TriumphPay Audit?
Search
Invoices
- How do I select which invoice template to use with different customers?
- How do I view another user’s presence within a load?
Account
- Why am I getting a “Failed to Update Contact” message?
- How do I create a custom auto-signature?
- How do I reset my TriumphPay Audit password?
TriumphPay Support
TriumphPay Audit Portal Navigation
TriumphPay Audit Document Viewer Keyboard Shortcuts
You can find additional details on the Help page or by hovering over the icons on the document viewer.
For handling documents
| Action | Keyboard shortcuts |
| Mark POD | Alt+D or 0 (Number pad) |
| Mark page as illegible | Alt+T |
| Edit doctypes | Alt+E or * (Number pad) |
| Zoom in | Alt+= or + (Number pad) |
| Zoom out | Alt+- or – (Number pad) |
| Rotate page to the right | Right arrow key |
| Rotate page to the left | Left arrow key |
For navigating between documents and groups
| Action | Keyboard shortcuts |
| Skip to next page | PgDn or Alt+Shift+P |
| Skip to previous page | PgUp or Alt+P |
| Jump to next Group | Alt+G |
| Jump to previous Group | Alt+Shift+G |
How do I add, edit and delete users from TriumphPay Audit?
TriumphPay Audit allows those with administrative privileges the ability to add, edit, and disable (delete) users.
Adding Users
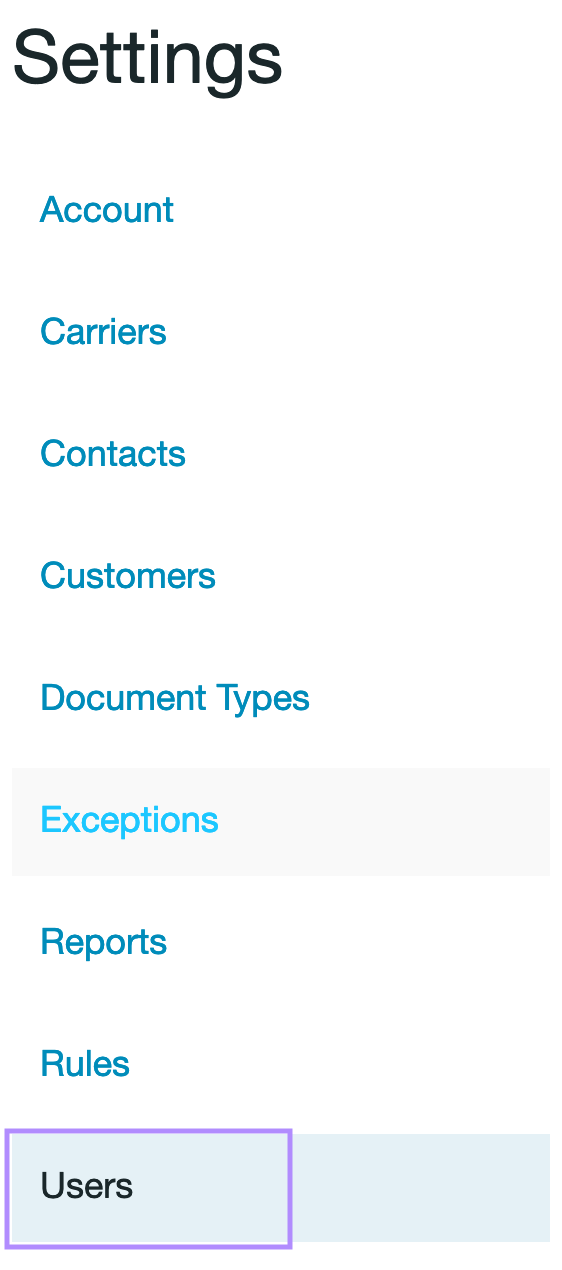
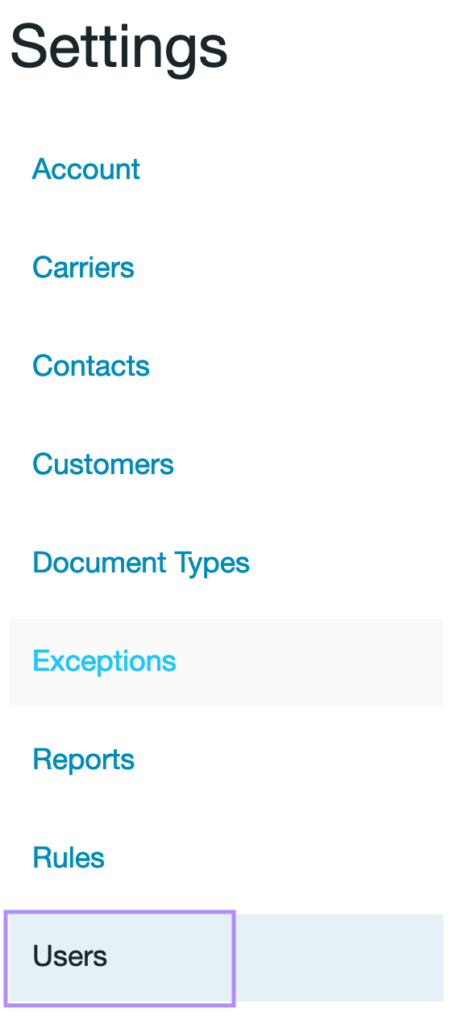
To add a new user to your TriumphPay Audit account, please select Settings from the upper right-hand toolbar, then select Users from the left-hand menu.


This menu is only accessible for users with administrative privileges. If you need your account privileges adjusted, please contact your account admin or TriumphPay Audit Support.
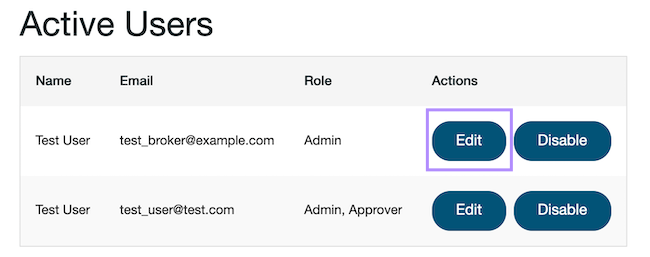
From the screen which loads you will see two sections, one which contains a listing of existing active and inactive (“Disabled”) users. To add a new user, select the New User button between the two sections.
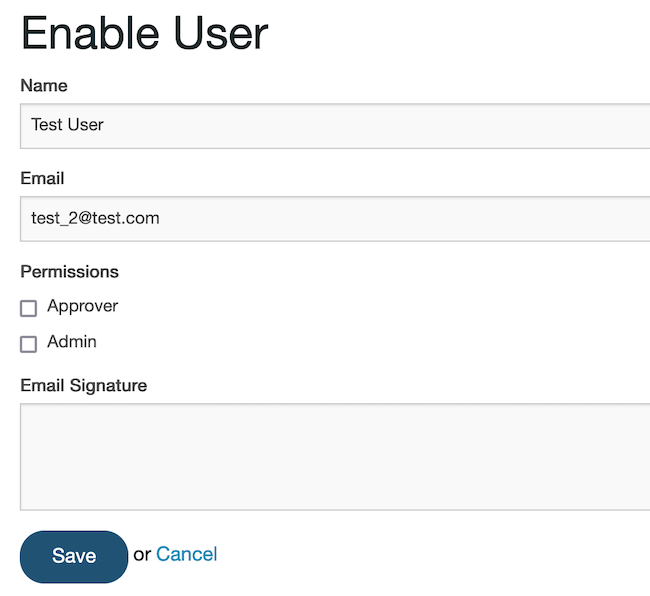
In the New User menu, enter the name and email address of the user which you would like to add.
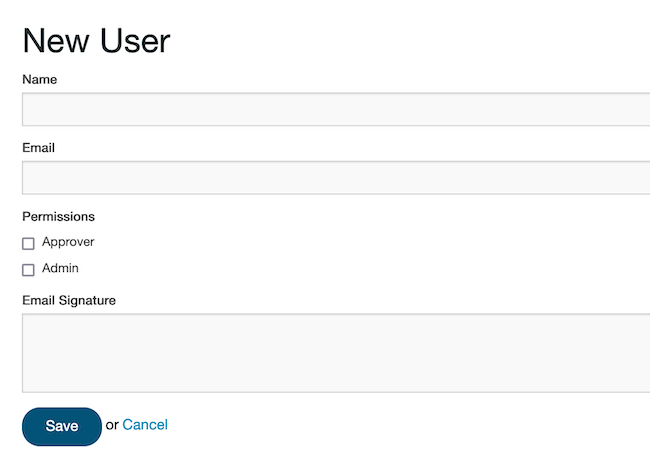
Optional:
Select the User Roles
- Basic (No boxes checked) – Can process but not approve Invoices
- Approver – Can process and approve invoices
- Admin – Can process and approve invoices
- Can update account settings (including adding and disabling users)
- Receivables – Allows full Receivables access; can view and send
Create an email auto-signature for the user that will appear in messages sent through TriumphPay Audit.
Select Save to create the account; this will trigger a Welcome email to be sent.
If you are creating an account for a new hire, please ensure their company email has been created and is active, otherwise their Welcome email will bounce.
Editing Existing User Info
To edit an existing user within your TriumphPay Audit account, please select Settings from the upper right-hand toolbar, then select Users from the left-hand menu.


This menu is only accessible for users with administrative privileges. If you need your account privileges adjusted, please contact your account admin or TriumphPay Audit Support.
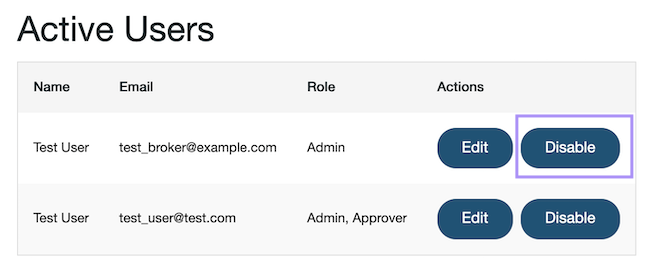
From the screen which loads you will see two sections, one which contains a listing of existing active and inactive (“Disabled”) users. To edit an existing user, select the Edit button next to the user in question.

You will then be able to edit the user’s name, email address, auto-signature and account permissions, if so desired.
- Basic (No boxes checked) – Can process but not approve invoices
- Approver – Can process and approve invoices
- Admin – Can process and approve invoices
– Can update account settings (including adding and disabling users) - Receivables – Allows full receivables access; can view and send
Select Save to update the user’s account and return to the User menu.
Deactivating Users
To deactivate (disable) an existing user within your TriumphPay Audit account, please select Settings from the upper right-hand toolbar, then select Users from the left-hand menu.
This menu is only accessible for users with administrative privileges. If you need your account privileges adjusted, please contact your account admin or TriumphPay Audit Support.

From the list of all active users, select the Disable button next to the account you’d like to deactivate:
When you disable an account, it will move to the Disabled Users section beneath Active Users.
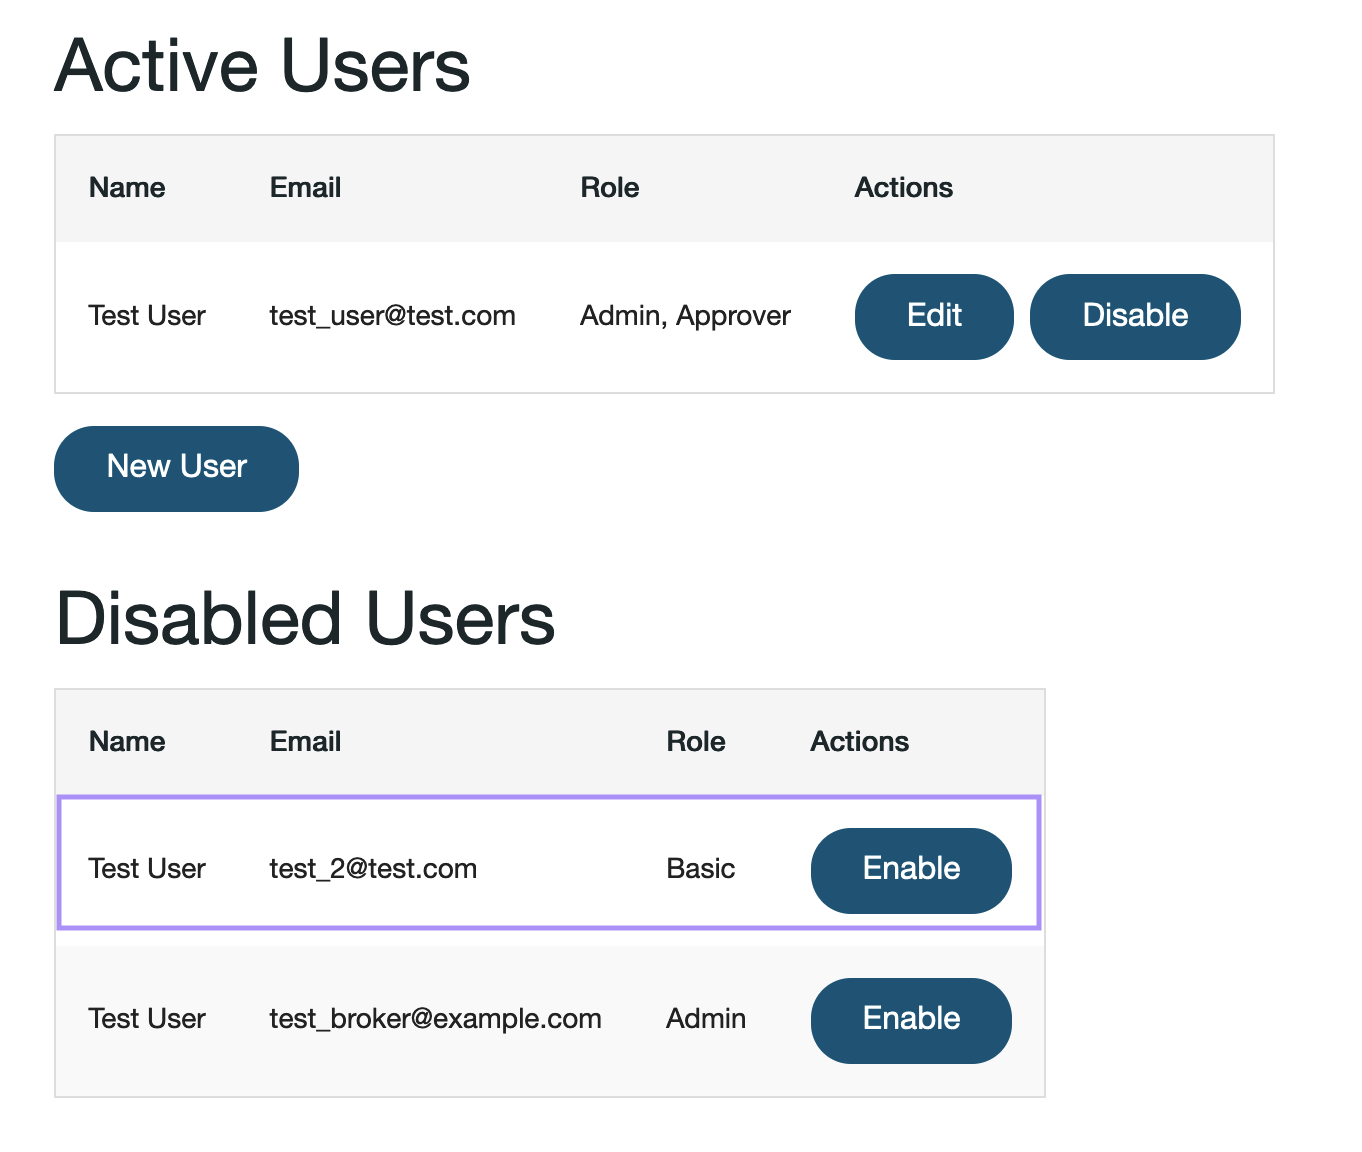
To reactivate an account, find the account under Disabled Users, click Enable, and then confirm the settings are still correct before saving.
Resetting Passwords
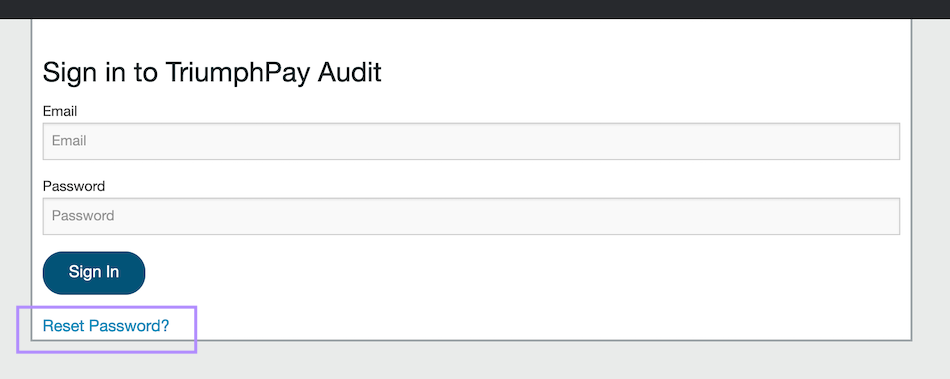
To reset your TriumphPay Audit password, please navigate to https://audit.triumphpay.com/app/login and select Reset Password? which is located under the Sign In button.

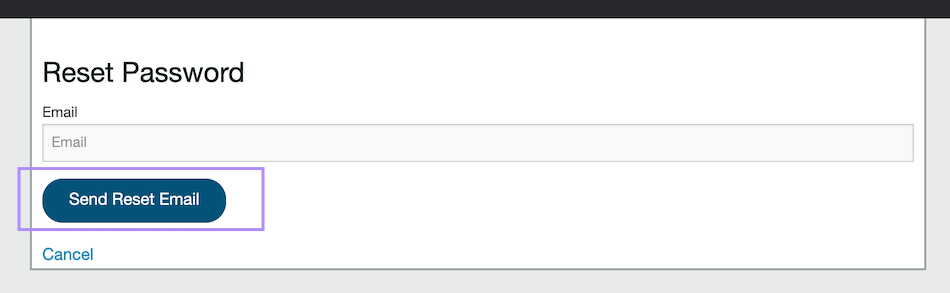
From the screen which loads, enter your email address and select Send Reset Email.

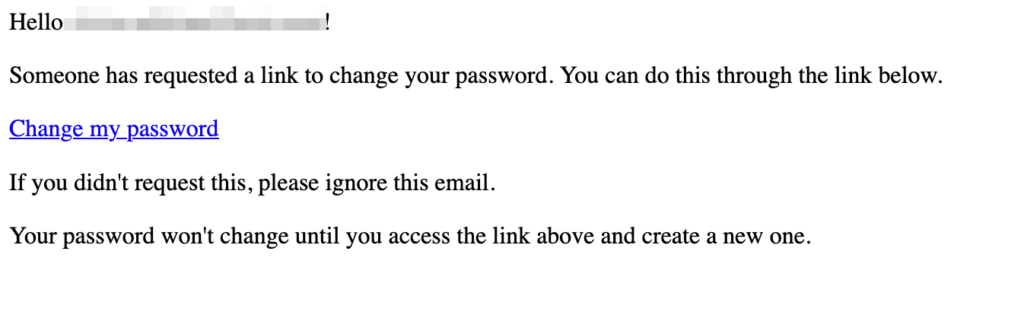
TriumphPay Audit will send an email containing a URL which contains a one-time use token. It is recommended that you complete the password reset within a private or incognito browser window.
If you encounter any difficulty with resetting your password or logging into TriumphPay Audit, please submit a ticket to TriumphPay Audit Support for additional assistance.
Common User Account Questions:
What do I do if a new user has not yet received their Welcome Email?
Please check your Spam settings to see if that email was accidentally flagged as junk. If you are unable to find the welcome email, you can reset their password by accessing the TriumphPay Audit Login screen and following the prompt.
If you created their TriumphPay Audit account before you created their work email, that welcome email had no destination and most likely bounced. Please contact Support to fix the issue.
Can I reset passwords from my account settings?
Passwords can only be reset from the TriumphPay Audit Login screen.
How do I change the signature my messages are being sent from?
You can update the default signature for your account by editing your account settings. If you can’t access the Users menu, please ask your TriumphPay Audit administrator for assistance.
Why can’t I approve documents?
You don’t have ‘Approver’ status, but you can update your account permissions with your TriumphPay Audit administrator’s help.
Why am I receiving this message? “That email address is not associated with an account. Email not sent.”
Confirm that you are entering the email address associated with your TriumphPay Audit account. If you’re certain that the email address is correct, please contact TriumphPay Audit Support.
If a new employee is getting that error, it’s most likely because their TriumphPay Audit account was created before their email account was active. If that is the case, please let us know.
How do I see the processed queue and/or approve invoices?
Within TriumphPay Audit, some accounts will display a “Processed” queue which is used as a holding area for invoices that need final approval before being sent to the TMS. In this instance, only users who have “Approver” or “Admin” privileges will be able to complete this task.
Basic User View

Approver and Admin View

If you are unable to see this queue while other users within your company have access, it likely means that you are a Basic user and do not have the required permissions.
This can be updated within your account permissions by your TriumphPay Audit administrator.
For more information about account permissions, please see this article.
If you have any questions, or need further assistance, please contact TriumphPay Audit Support.
How do I merge emails on the dashboard?
Merging emails from multiple carriers is possible from the TriumphPay Audit Dashboard, by utilizing the following steps:
- Open the first message you want to merge
- Click Merge Email from the upper right-hand side of the screen

- Select the email in the list you see that you want to merge. Your Carrier will be defaulted to the current Email Carrier for the item in question
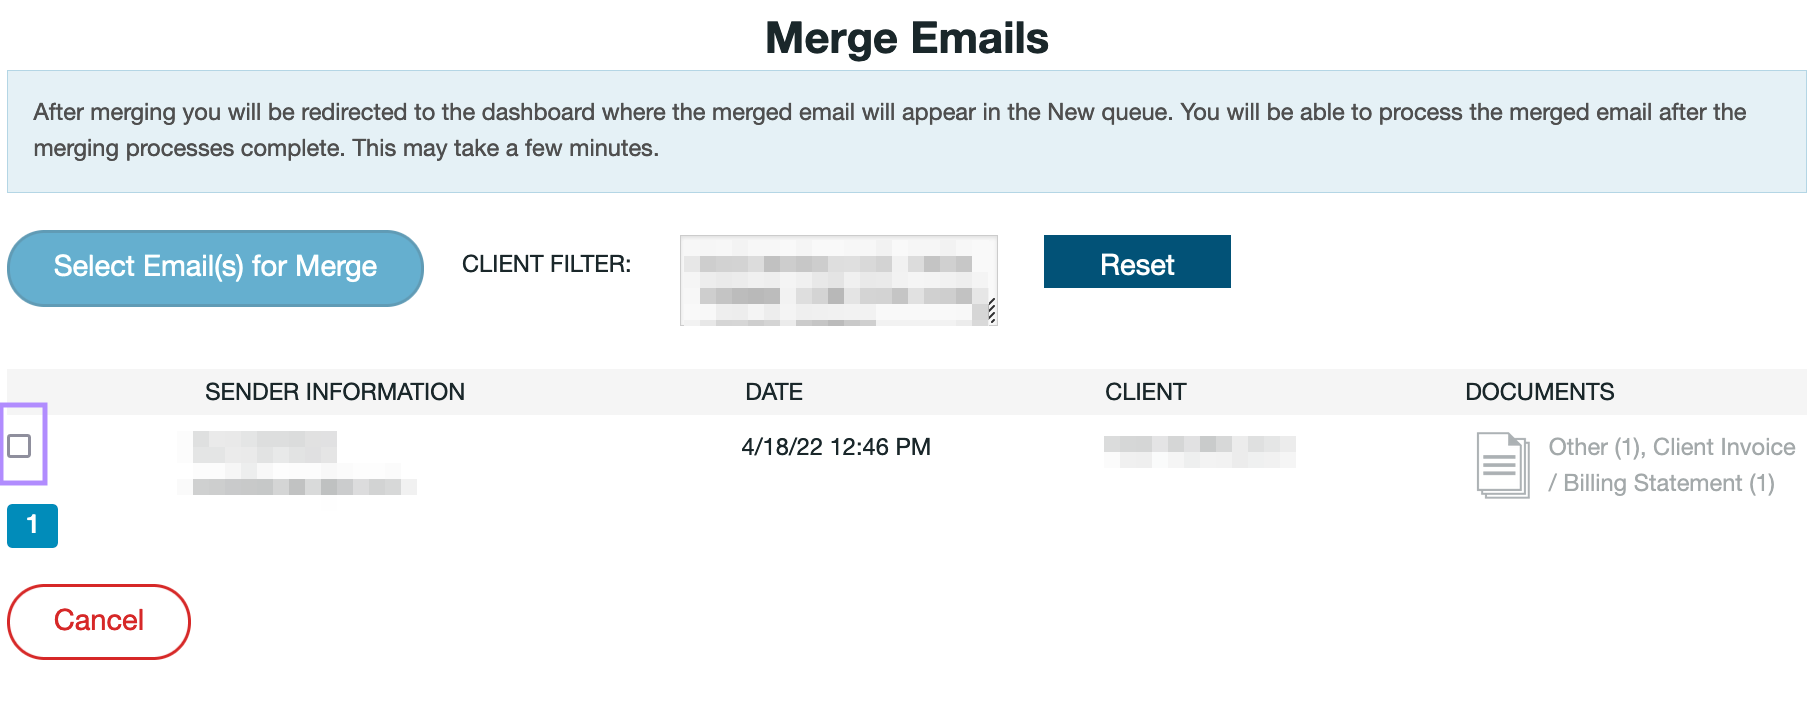
- Once you select the message, you will notice “Select Email(s) for Merge” has turned green and now says “Merge Selected Emails”
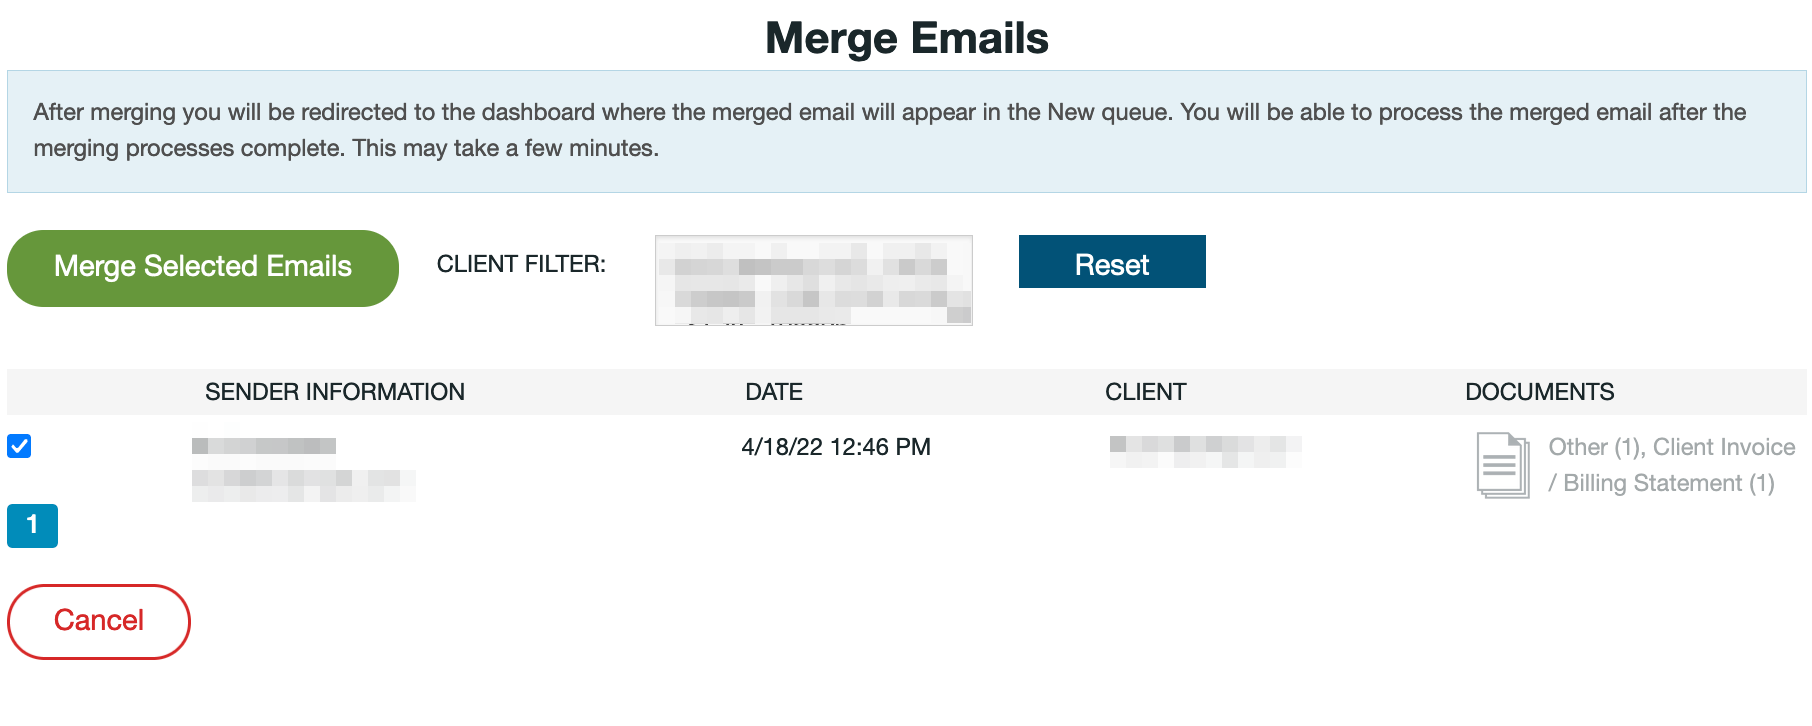
- Click Merge Selected Emails when ready
You will be taken back to the dashboard where the message in question will display “Importing.” Once the importing process has completed, you can continue processing as normal.
If you have any questions, or need further assistance, please contact TriumphPay Audit Support.
Documents
How do I ignore or “delete” a document?
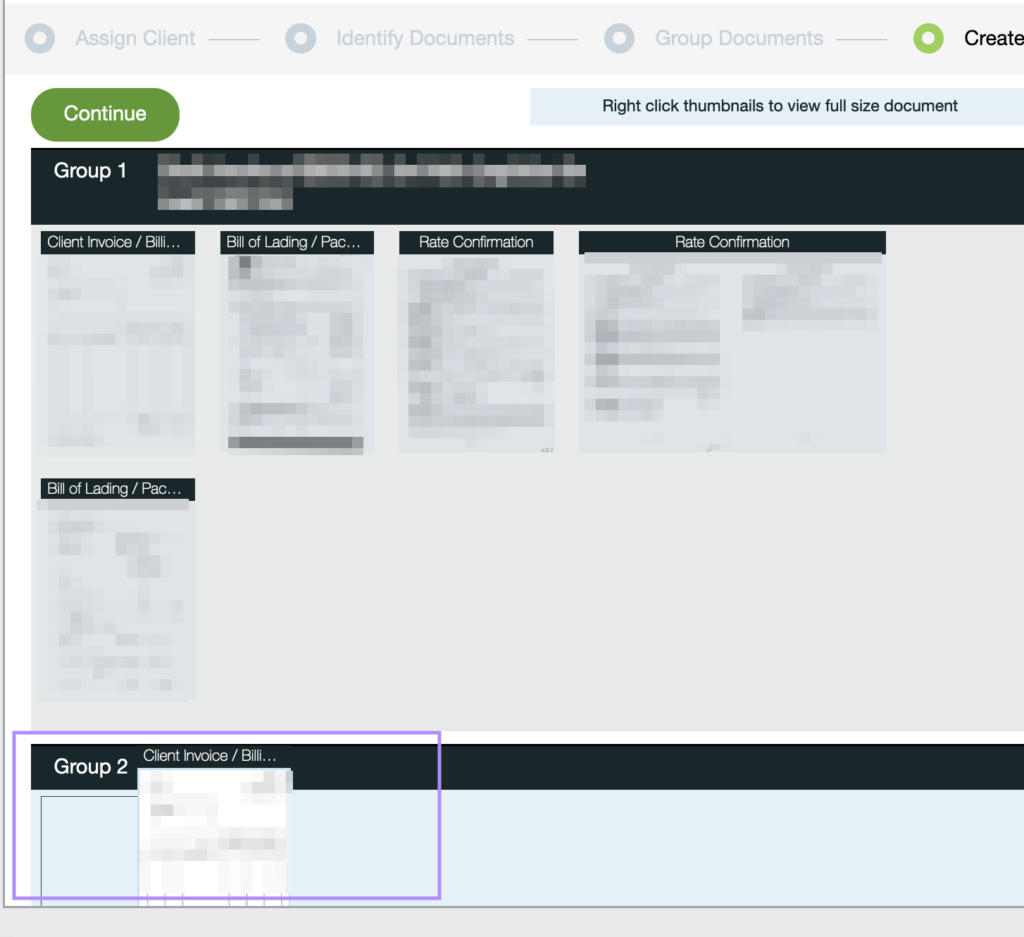
While TriumphPay Audit does not allow you to delete a document, there are ways to remove the item without ignoring the entire email which it is contained within. You can do this by utilizing the Group Documents feature.
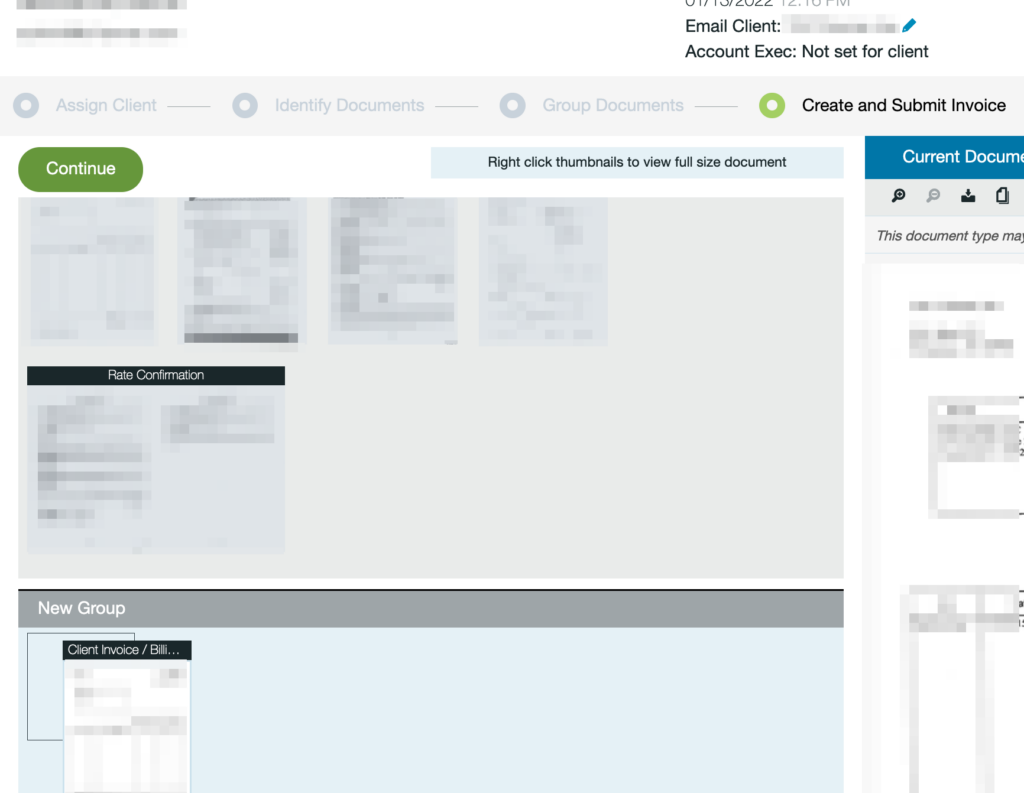
Within the load in question, select Group Documents from the gray progress bar.

Select the document which you would like to ignore and drag it into the New Group section under the Group 1 box.
Click the green Continue button to the upper left-hand side of Group 1 to continue processing the load.
Once you have created the second group, there are two ways in which you can handle the documents. If you no longer need to retain the documents, you can ignore this group by adding an Exception. In this instance, you would select Does not need to be processed from within the drop down menu.
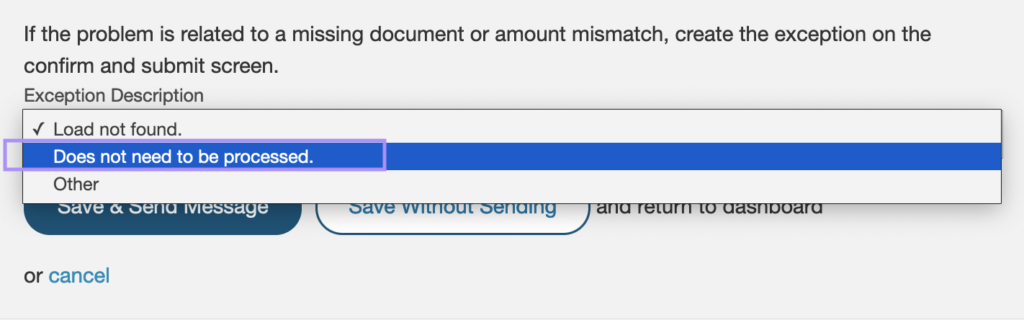
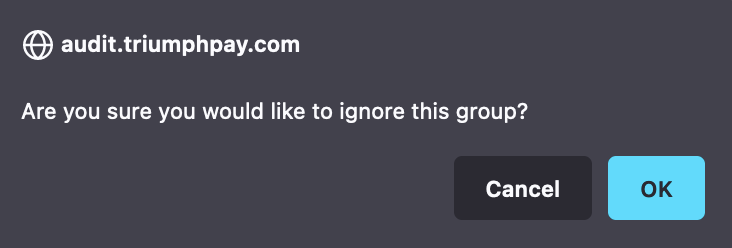
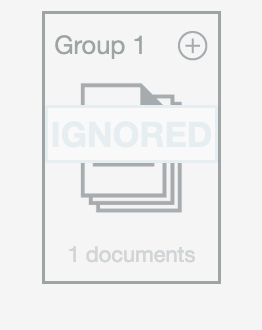
After selecting either Save & Send Message or Save Without Sending you will receive a prompt to confirm that you want to ignore the group in question; click OK. Once the group has been ignored, you will no longer see it on your Dashboard. The only place that will be visible is from within the original email.
If you would prefer to ignore the document but still connect to an existing load, rather than creating an Exception you would assign it to the correct load by selecting Assigned to new {Carrier Name} Invoice. This will create a second invoice on the load which you can select independently.
Once you have created the second invoice, you can select Ignore. This will still be available within TriumphPay Audit and can also be located using Activity Search.

If you have any questions, or need further assistance, please contact TriumphPay Audit Support.
How do I send documents to TriumphPay Audit?
TriumphPay Audit can receive and import documents in a number of formats. This guide will provide a basic overview of how documents received via email are handled.
When you sign up for TriumphPay Audit, you will be provided with an email address that ends with @audit.triumphpay.com. Messages that are sent to this address will appear in the TriumphPay Audit dashboard.
- Emails must be less than 25MB in total size, or they will be silently rejected by our mail provider.
- Images must be greater than 400px in both height and width
- The image must be in a supported format including:
- JPEG
- PNG
- GIF
- HEIC
- Microsoft Word
- Microsoft Excel
- .zip containing the above
- Other formats may be supported, please contact TriumphPay Audit support with any questions
It takes time for TriumphPay Audit to convert the documents to images, perform OCR, and extract required data. TriumphPay Audit staff are notified of any messages that does not completely import in 60 minutes.
How do I group documents within TriumphPay Audit?
When multiple documents are sent to TriumphPay Audit in a single email, you may need to assign these documents to different loads. To accomplish this, you can use the Group Documents feature.
To begin this process, start by selecting Group Documents from the gray progress bar.

To place documents within unique loads, drag and drop the document thumbnail into the New Group section below Group 1.
TriumphPay Audit allows you to create as many groups as there are documents, however each group must contain at least one document. If you remove all documents from a group, it will no longer be displayed until you move a new document back into it.
Once all documents are grouped as desired, select the green Continue button to resume processing.
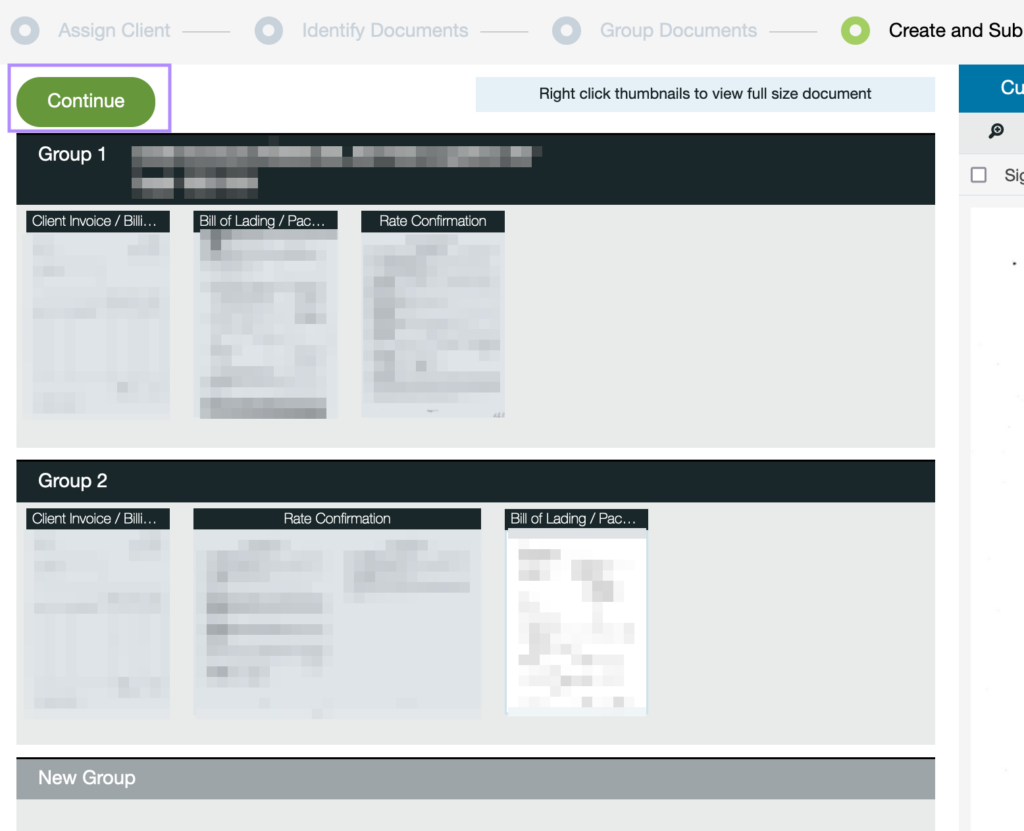
TriumphPay Audit will prompt you to assign a load to your first document group and continue processing. If you prefer to begin with another group, you can select the group from the document viewer on the right-hand side of vertical menu.
When you return to the original message, each document group will be labeled with the assigned Load IDs.
If you have any questions, or need further assistance, please contact TriumphPay Audit Support.
Search
How do I use TriumphPay Audit’s activity search?
TriumphPay Audit’s Activity search allows you to view all recent activity, as well as searching through previous actions by utilizing a number of filters.
To use this feature, begin by selecting Activity from the upper right-hand toolbar.

From the page which loads you will see the most recent activity by default, however you can utilize any of the available filters to better narrow down your search criteria, then click Update.
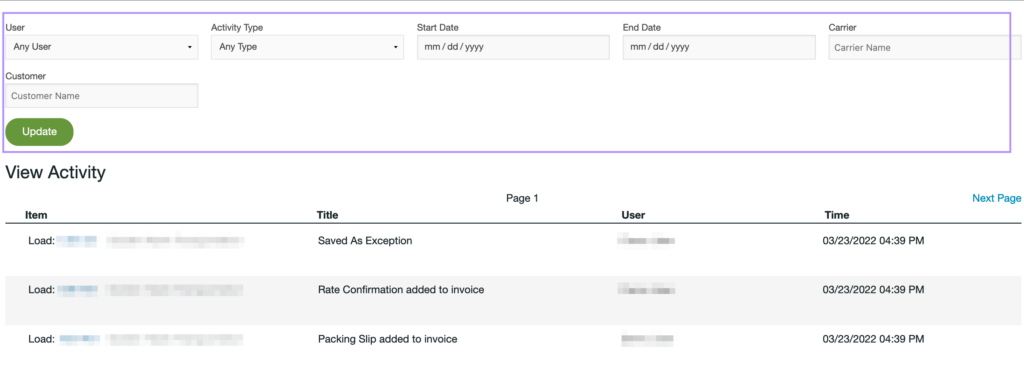
Filter Options
User: Search an individual user’s activity
Activity Type: Search by event type (ie: Saved as Exception, Invoice Sent to the TMS, Invoice Ignored)
Start / End Date: Search within a specific time frame
Carrier: Search by carrier
Customer (Broker Accounts only): Search by the specific Customer associated with the Load
Debtor (Factor Accounts only): Search by the specific Debtor associated with the Load
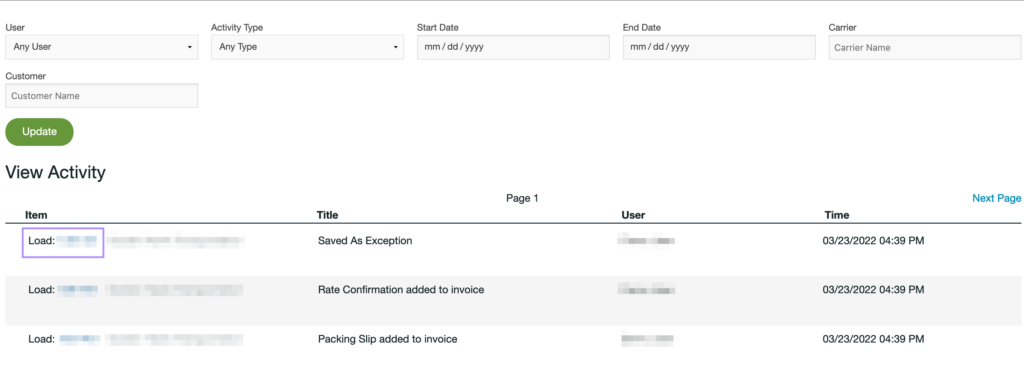
To view any of the Loads shown within the search results, click on the hyperlinked Load #### returned.
If you have any questions, or need further assistance, please contact TriumphPay Audit Support.
How do I use TriumphPay Audit’s email search?
TriumphPay Audit’s Email Search allows you to search through emails which may no longer be visible on your Dashboard, allowing you to find items which are no longer easily accessible.
To use this feature, begin by selecting Email Search from the upper right-hand toolbar.
Using the various filters, you can search for the item in question.
Filter Options
Search Text: Enter any text which might be contained within the email you are looking for (ie: subjects, keywords)
Carrier: Locate emails based on a specific carrier (Note: Not all emails will be automatically assigned to a carrier or associated with the correct one)
Start / End Date: Search within a specific date range
Include Sent Emails: TriumphPay Audit defaults to searching only emails which have been received, by selecting this box it will also include emails which users have sent from TriumphPay Audit.
If you have any questions, or need further assistance, please contact TriumphPay Audit Support.
Filters
How do I use TriumphPay Audit’s “NOT” filter?
TriumphPay Audit utilizes filters to help you find items contained on your Dashboard quickly and easily.

To enable a filter, simply click on the item which you want to filter by. In the below example, we are filtering by “Large Batch” as indicated by the blue background. You will see that by selecting this, only items which display the blue “Large Batch” indicator are present on the Dashboard.
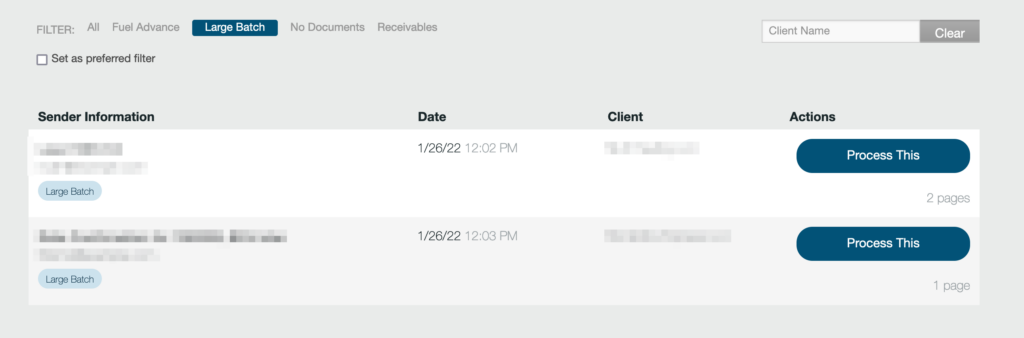
The same filter which allows you to filter by an item also allows you to filter excluding an item by changing the filter to “Not.” You can do this by clicking on the filter name once again, adding a gray background and changing it from “Large Batch” to “Not Large Batch.”
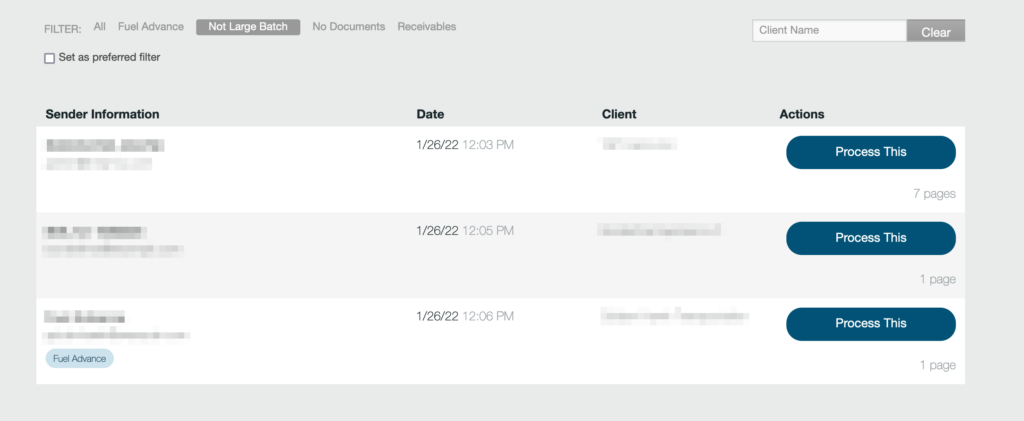
Clicking on the “Not Large Batch” filter will remove all filters and return to the “All” view.
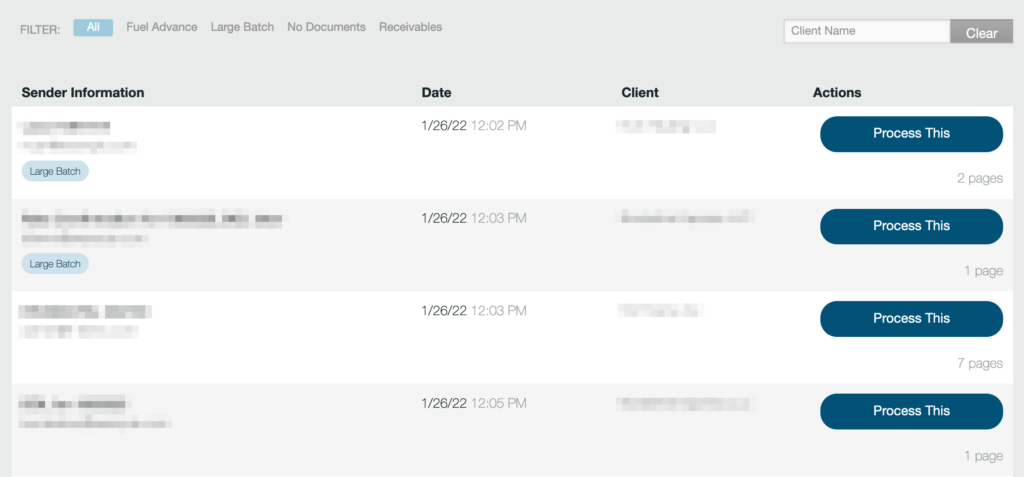
You can also accomplish this by clicking on the “All” filter directly.

If there are specific filters which you want to see by default, you can select the checkbox next to “Set as preferred filter” and this will be the view which your Dashboard loads automatically.

This is set on a per user basis and will not be the same for all users.
If you have any questions, or need further assistance, please contact TriumphPay Audit support.
How do I use the auto-replies filter?
To prevent repeated duplicate emails from reaching your TriumphPay Audit Dashboard, you can utilize the Auto-Replies Filter which will keep a record of the emails received, but not show them within your New Queue.
To use this feature, emails which are being received must be from the same Email Address and contain the same data within the Subject or Body of the email.
To create this filter, access Settings from the upper left-hand corner of your TriumphPay Dashboard.

From the Account Settings menu which loads, scroll to the bottom of the page where you will see an option to click on Auto Reply Filter. Enter the Email Address, Subject and/or Body of the email which you no longer would like to receive and select Create New Filter.
Please note, while text within the Subject and Body fields are optional, an Email Address is required.
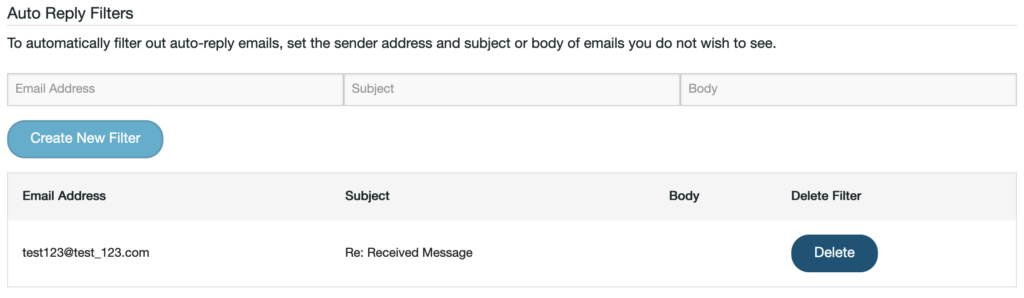
Should you later decided to resume receiving emails from the sender, select Delete under the heading Delete Filter.
If you have any questions, or need further assistance, please contact TriumphPay Audit Support.
Invoices
How do I select which invoice template to use with different customers?
TriumphPay Audit allows users to enable multiple invoice templates, allowing the user to select which invoice will be used with individual customers.
To update the invoice template in question, begin by clicking on Settings from the upper right-hand toolbar.

Select Customers from the left-hand menu.

Filter by the Customer in question and select View.
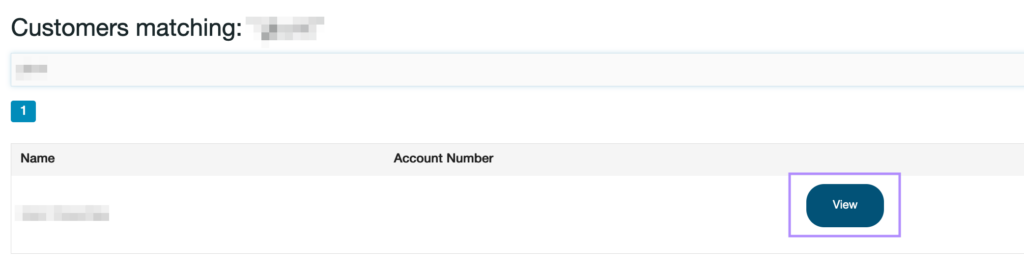
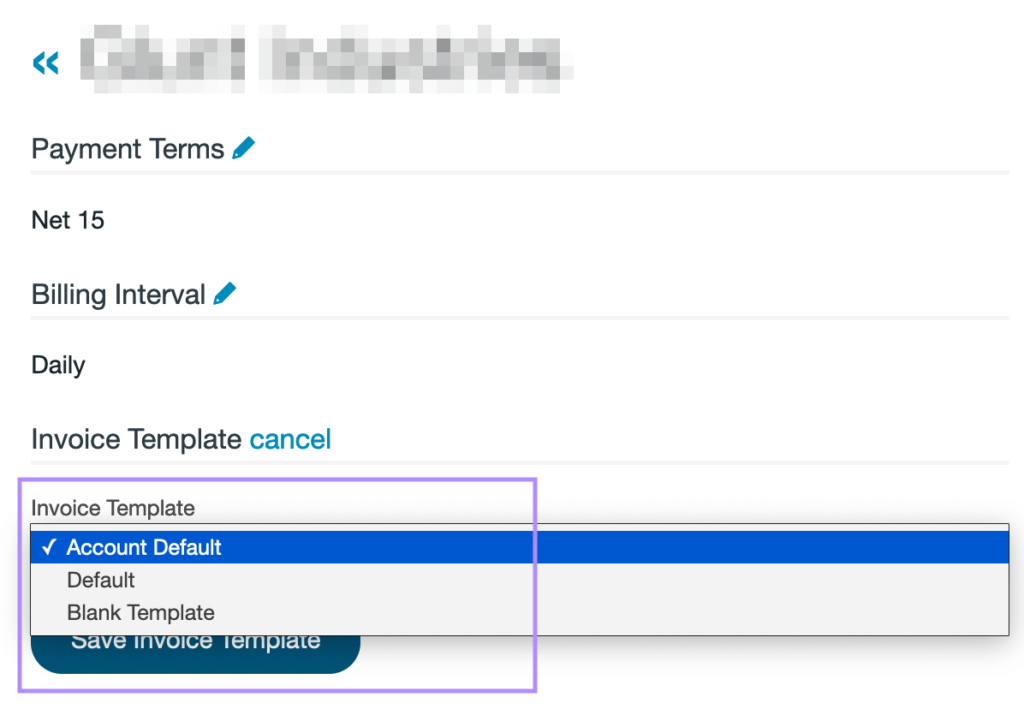
To change the template which will be utilized, click on the blue pencil next to Invoice Template.
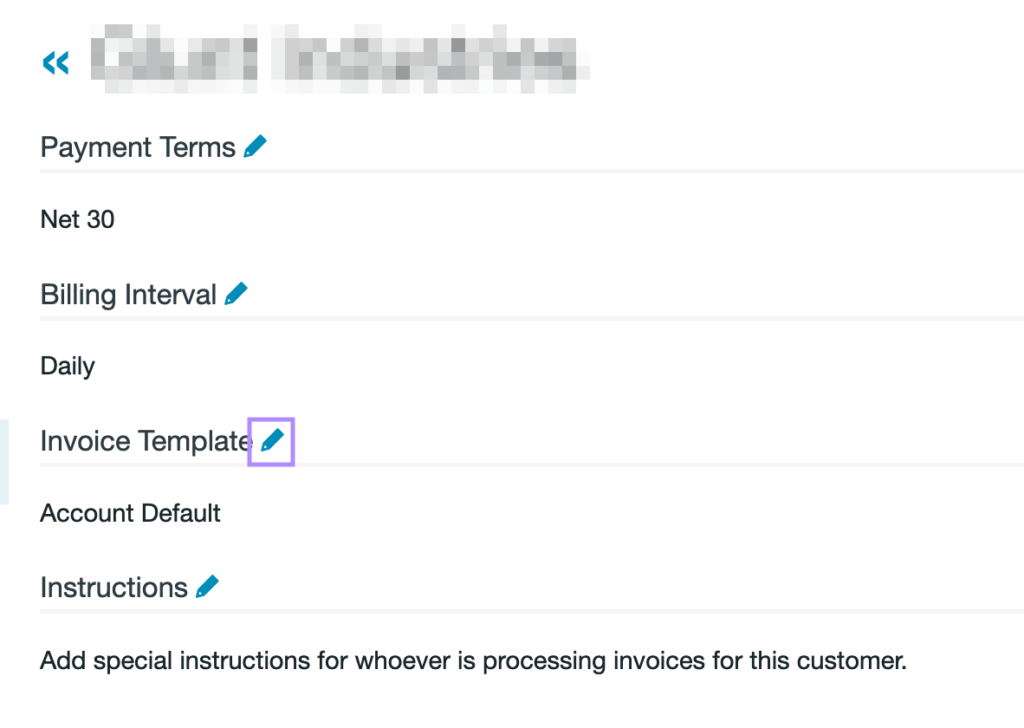
Select the desired template and select Save Invoice Template.
If you have any questions or would like information about utilizing multiple invoice templates, please contact TriumphPay Audit Support.
How do I view another user’s presence within a load?
When viewing the New queue within your TriumphPay Audit Dashboard, you will be alerted to other user’s presence by a small orange indicator on the Load in question. Sometimes it will appear that this is not displaying correctly, which can lead to confusion regarding who is working on a load at a given time.

There are several reasons why the presence indicator may not be displaying as anticipated, the most frequent being that your browser’s cache needs to be refreshed. You can accomplish this by logging out of TriumphPay Audit, clearing your cache and logging back in once again.
How to Clear Your Cache
Google Chrome:
1. On your computer, open Chrome.
2. Click on More in the upper-right
3. Click More tools
4. Clear browsing data
5. At the top, choose a time range (To delete everything, select All time.)
6. Next to “Cookies and other site data” and “Cached images and files,” check the boxes.
7. Click Clear data.
Mozilla Firefox:
1. On your computer, open Firefox
2. Click on the three line Menu icon in the upper-right
3. Click on Library.
4. Click on History.
5. Click on Clear Recent History
6. In the Time range to clear: drop-down menu, select Everything.
7. Check the boxes next to Cookies and Cache (uncheck any other boxes which may be selected).
8. Click the Clear Now button.
9. Close all Mozilla Firefox browser windows.
If you are still unable to see presence or have your presence detected, please provide the following information and contact TriumphPay Audit Support.
Are multiple individuals unable to see presence, or is it only occurring with one person?
One Person:
Did the individual clear their cache as requested above? If no, please request they do so; does this change what presence is displayed? If yes, please go to the next question.
Multiple People:
Are all users who are experiencing this in the same location? Are they all connecting by the same method? What is the internet browser and version of the user(s) who are experiencing this issue?
What type of connection is being used? Is it a direct connection or over a Virtual Private Network (VPN)?
If using a VPN: if you connect directly or using another device which is not on the same network, does this change what presence is displayed?
What add-ons are being used on the internet browser in question? Items such as anti-virus and ad-block can interfere with the presence indicator since it changes how the data is transmitted. If you disable the add-ons, does this change what presence is displayed?
Account
Why am I getting a “Failed to Update Contact” message?
When attempting to add an email address to a client within TriumphPay Audit, you may receive a red banner across the bottom of the page which says “Failed to Update Contact”.
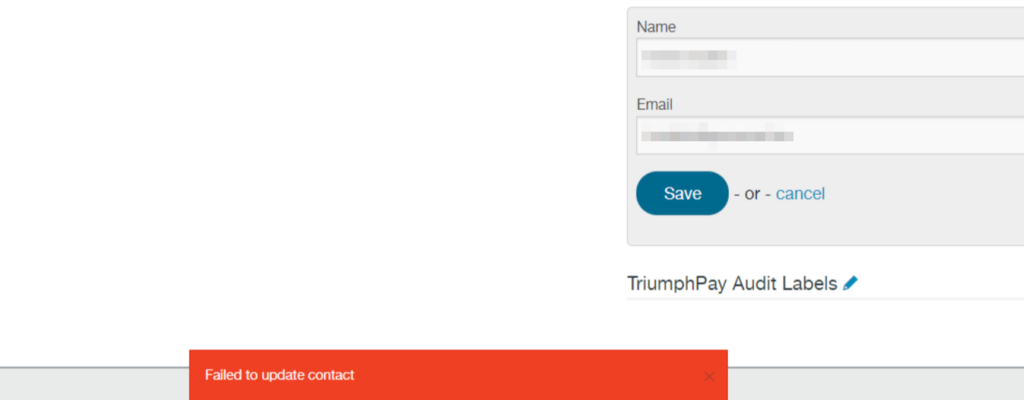
This most frequently happens either because the email address is already listed as a contact, but rather than being associated with a carrier/client, it is listed as a General – No Carrier, or because the carrier which it is associated has been inactivated.
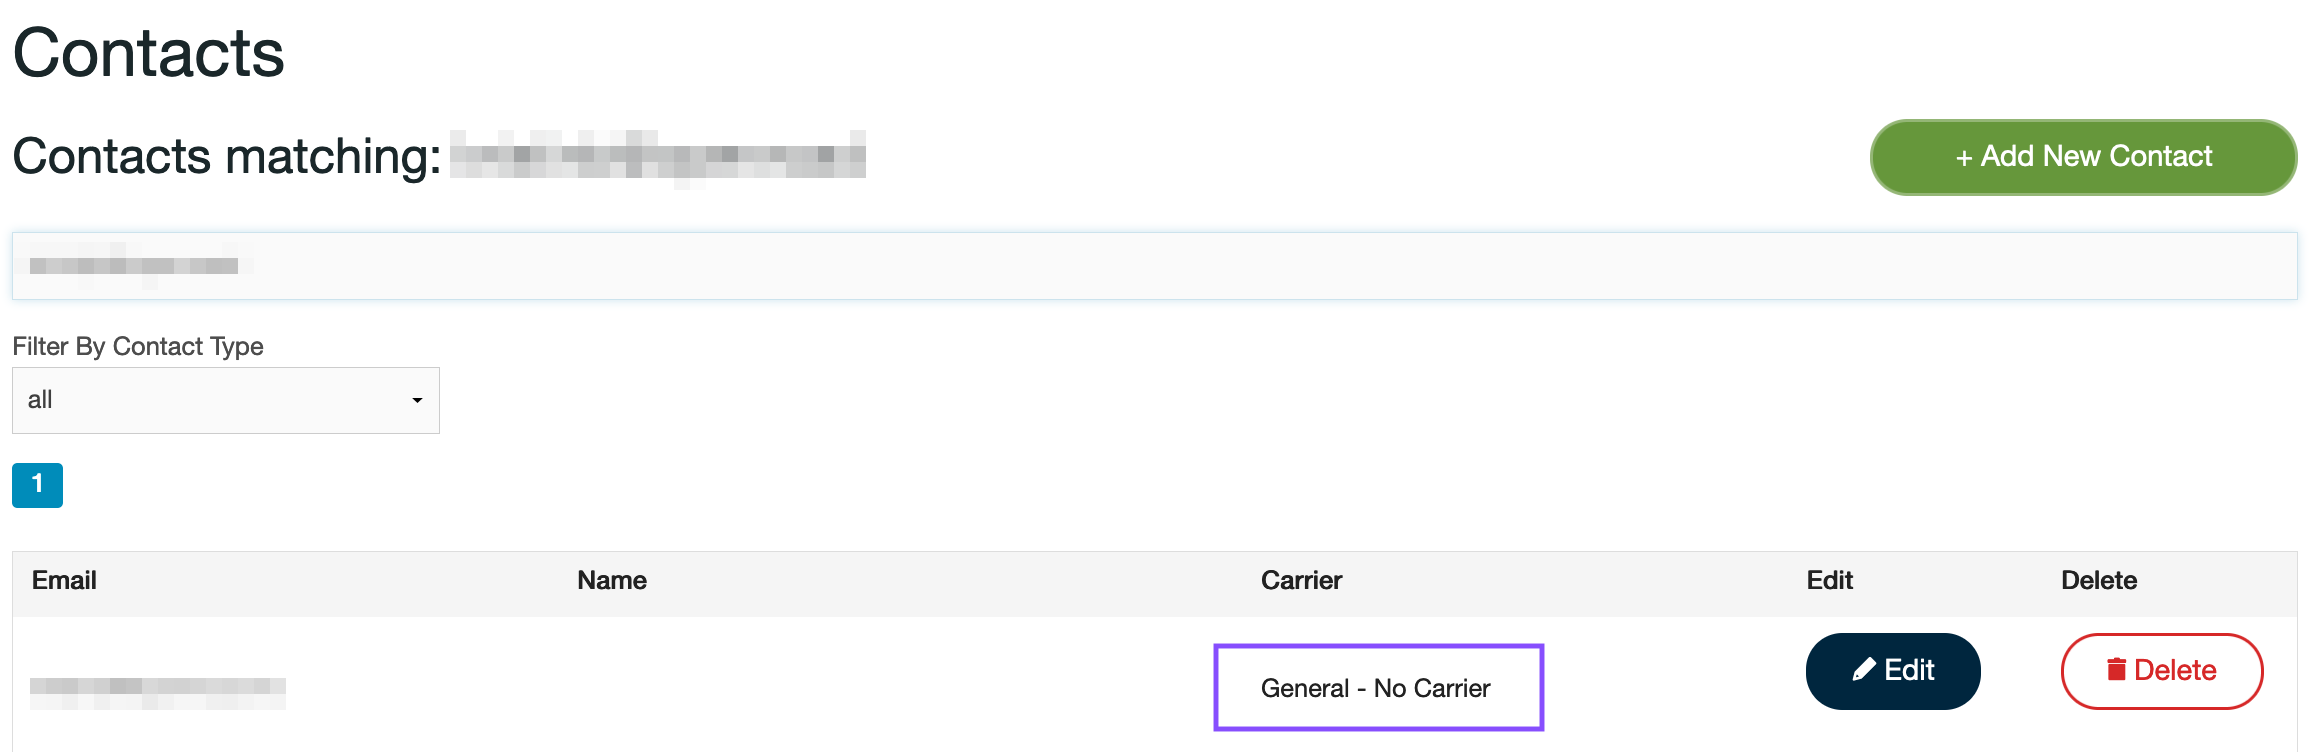
To update this contact to a Carrier contact:
- Select Edit.
- Click into the drop down box under Select Contact Type and select carrier rather than general.
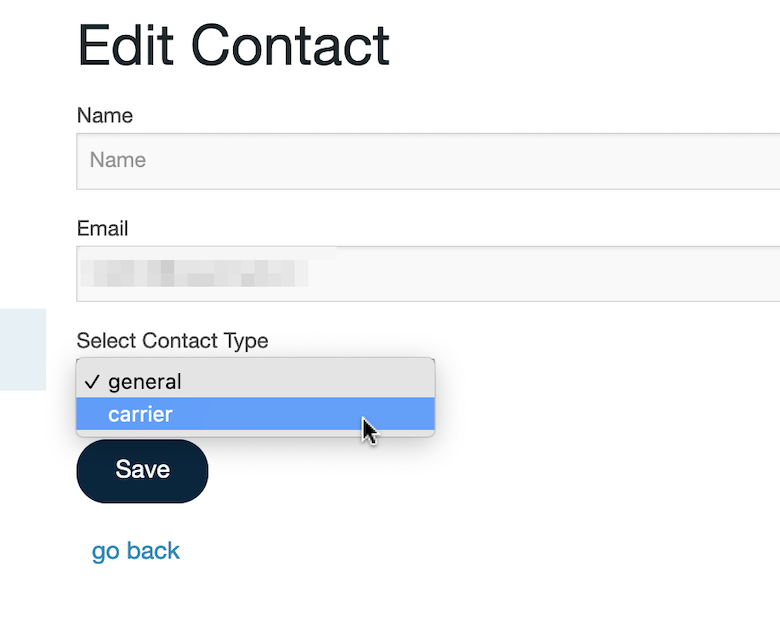
- Add the Carrier / Client Name in the Select Carrier box and Save.
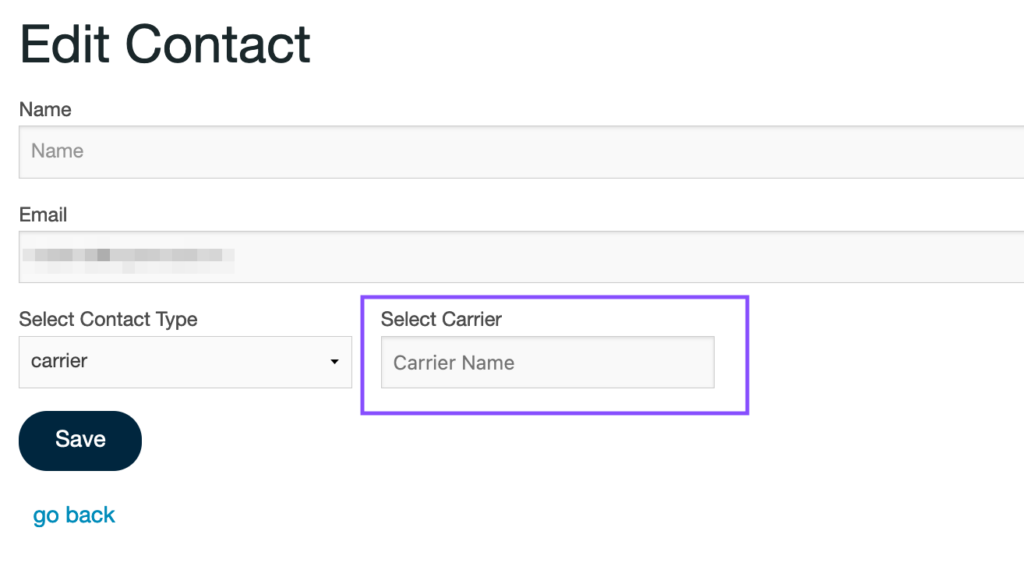
You can then confirm that the email address is visible under the carrier / client intended.
For additional assistance, please submit a ticket to TriumphPay Support.
How do I create a custom auto-signature?
Within TriumphPay Audit, there are two ways to create and/or update an auto-signature. The first is on a per-user basis, the second is on a company-wide basis.
Per User:
To create an auto-signature on a per user basis, begin by clicking on Settings from the upper right-hand toolbar.

Select Users from the left-hand menu.
This menu is only accessible for users with administrative privileges. If you need your account privileges adjusted, please contact your account admin or TriumphPay Audit Support.
Select Edit next to the name of the user whose auto-signature you would like to edit.
Enter the auto-signature which you would like displayed for the user in question under “Email Signature” and select Save.

Company Wide:
To request updating the auto-signature on a company-wide basis, or for additional assistance, please contact TriumphPay Audit Support.
How do I reset my TriumphPay Audit password?
To reset your TriumphPay Audit password, please navigate to https://audit.triumphpay.com/app/login and select Reset Password? which is located under the Sign In button.
From the screen which loads, enter your email address and select Send Reset Email.
TriumphPay Audit will send an email which has a URL with a one-time use token. It is recommended that you complete the password reset within a private or incognito browser window.
If you encounter any difficulty with resetting your password or logging into TriumphPay Audit, please submit a ticket to TriumphPay Audit Support for additional assistance.
TriumphPay Support
TriumphPay Audit Help
In case you experienced any difficulty logging into TriumphPay Audit, please follow the below steps to clear your cache:
Google Chrome:
- Click the Tools menu (three dotted lines in the upper-right corner).
- Select History.
- Set the time range to All Time.
- Check Cookies and Other Site Data and Cached Images and Files.
- Click Clear Data.
- Quit and reopen.
Safari:
- Click on Safari on the top menu bar.
- Click Preferences.
- Click the Privacy tab.
- Click Manage Website Data…
- Click Remove All.
- Click Remove Now.
- Quit Safari and save your changes.
Firefox:
- Click the Tools bar.
- Click Options.
- On the menu to the left, select Privacy & Security.
- Under the Cookies and Site Data option, click the Clear Data button.
- Select only the two options and select Clear Now.
- Quit for the changes to take effect.
Keyboard Shortcut:
If you are using Internet Explorer, Edge, Google Chrome, or Mozilla Firefox you can quickly clear cache with a keyboard shortcut:
While in your browser, press Ctrl + Shift + Delete simultaneously on the keyboard to open the appropriate window.
IMPORTANT: Be sure and close/quit the browser and restart it after clearing the cache and cookies.
Have trouble or need help connecting to TriumphPay? We’re here to help.
Ask your assigned sales contact, chat with us using the icon below, or submit a question.
TriumphPay Business Hours
TriumphPay is open Monday – Friday.
- 7:00 am – 5:00 pm Central Standard Time
- 8:00 am – 6:00 pm Eastern Standard Time
- 6:00 am – 4:00 pm Mountain Standard Time
- 5:00 am – 3:00 pm Pacific Standard Time
For assistance, please contact TriumphPay Support.
Can’t find what you’re looking for?
Self Service
Available 24/7
Access invoices, payment status, reports, submit paperwork, manage wallet and QuickPay preferences, etc.
Live Support
Business Hours: Mon. – Fri., 7am – 5pm Central Standard Time
Fast, friendly experts to support carriers and factors for invoice/load verifications, NOA verifications, payment statuses, account changes, plus more.